Showing posts with label Marx Foods. Show all posts

Thursday, February 19, 2015

Silere Alpine Origin Lamb from New Zealand.....The Lord of The Lambs!!!

      
   Lamb. What's in a name? Quite a lot actually as I found out just last weekend when the kind people at Marx foods offered me a chance to sample something I'd never heard of before. Silere Alpine Origin Merino Lamb. To be honest, I've never made a study of lamb. I know about chicken, beef, fish certainly, and lots and lots about various vegetables. But lamb is just lamb, right? The only thing I knew about Merino lamb was that I have a drawer full of Merino wool sweaters. As it turns out I was wrong. There's a lot to learn about lamb and I was about to get an education.
 
   I don't eat a great deal of meat, in fact most of the last year I've been on a vegetarian if not vegan diet. Recently however, I've decided to incorporate a bit of meat into my eating, and on occasion, also add some dairy. I've been careful to use grass-fed, naturally-raised meats and only pastured dairy products. Luckily, living here in the heart of California Wine Country, that's not been hard to come by. We're surrounded by ranches and farms. However as it turns out, some of the best lamb in the world doesn't come from here or any where near here. It comes from Middle Earth.

   Actually I'm talking about New Zealand, home of Peter Jackson and Lord of the Rings and some of the damnedest fine lamb anyone could possibly enjoy. As a screenwriter I'm used to thinking of New Zealand like this:


As a chef I've now learned to think of it like this:


Viggo, delicious:


Silere Alpine Origin Merino Lamb, also delicious but in a different way.


Yes, they're ready for their close-up.

   You can't get more natural than Alpine grazed meat, and the Merino lamb I found to have a much lighter flavor, not fatty or gamy. Most of the time In cooking lamb, the meat overpowers almost everything which is why people pair it with strong flavors such a mint. The Silere lamb I cooked was leaner, delicate, and the flavors blended perfectly with the Indian spices I used. I decided that we should share this lamb with friends and who better than the people who make CocoaPlanet chocolate. I knew Anne and Jeff would be great lamb judges as they both have excellent palates. It was the prefect excuse for a dinner party, not that I need much encouragement. I'm always ready to cook!


  Cooking the Silere lamb was the easy part, as one does not want to do too much so that the meat stays tender and juicy. I could then devote some thought to a proper sauce which turned out to be a Sikandari Raan, a delicately flavored traditional sauce with a North Indian / Afghan influence. The sauce is very easy to make and can definitely be made ahead. Since the lamb cooks up quickly this is a great time saver. The perfect company dinner.

Silere Alpine Grazed Merino Lamb In Sikandari Sauce


Here's What You Need:
4 Silere Alpine Grazed Merino Lamb Loins
1 and 1/2 tsp Kashmiri chili
4 tbs coconut oil, or other vegetable oil

 3 cloves
4 green cardamom pods
3 black cardamom pods
A 2 inch stick of cinnamon
2 star anise
1 bay leaf
4 medium onions thinly sliced
2 tsp ground coridaner
2 tsp ground cumin
1 tsp turmeric
1 Tbs tomato paste
1 tsp salt or to taste
1/2 cup of yogurt


Here's What To Do:
Put on your onion goggles and start slicing the onions...


...like this:


Set them aside.


In a kadhai or skillet heat 4 Tbs of coconut or vegetable oil.


When the oil is hot, toss in the star anise, green and black cardamom pods, the bay leaf, cloves and cinnamon stick.


Saute the spices for one minute. They'll start to puff up a bit, then toss in your sliced onions.


Cook the onions until they're translucent and soft, then add in the Kashmiri Chili powder.


Add in the ground coriander, cumin, and turmeric and tomato paste.


Saute everything until the oil starts to separate from the sauce. Add in the salt.


When everything is well mixed, remove the bay leaf and put everything else into a blender or food processor.


Grind it up really well you want to avoid any hard pieces of spice left over. You can pour it through a strainer or cheese cloth to prevent this.
Set your sauce aside. If you are going to use it later or the next day, keep it covered in the fridge.
Before you cook your lamb make sure to bring it to room temperature.

Preheat the oven to 300 degrees
I found that the best way to cook this lamb was to sear it in hot hot hot cast iron and then finish it in the oven. One wants the internal temperature to be about 125 degrees for medium rare lamb.
Salt and pepper the lamb loins on both sides.
Place an empty, heavy, cast iron pan on the fire and heat that baby up.
When it's hot, hot, hot, lay the lamb loins in it fat side down. Cook them for about 4 minutes.

Meanwhile, as you see in the background, I'm heating the sauce on simmer. When it warms up, add in the yogurt, 1/4 cup at a time. The idea here is to make surer the sauce is smooth creamy and not overpoweringly hot. It depends no how much chili you or your guests like. The yogurt tames things down to whatever level one desires.
After about 4 minutes, turn the loins over and cook them on the other side for another four minutes.
After that take the whole pan and put it into the oven for another 10 minutes or so to finish.

Use a meat thermometer. When the lamb is 125 degrees inside, it's done medium rare unless you like it more well done, in which case, back into the oven for another few minutes.
After you take the meat out of the oven let it rest for about 10 minutes.
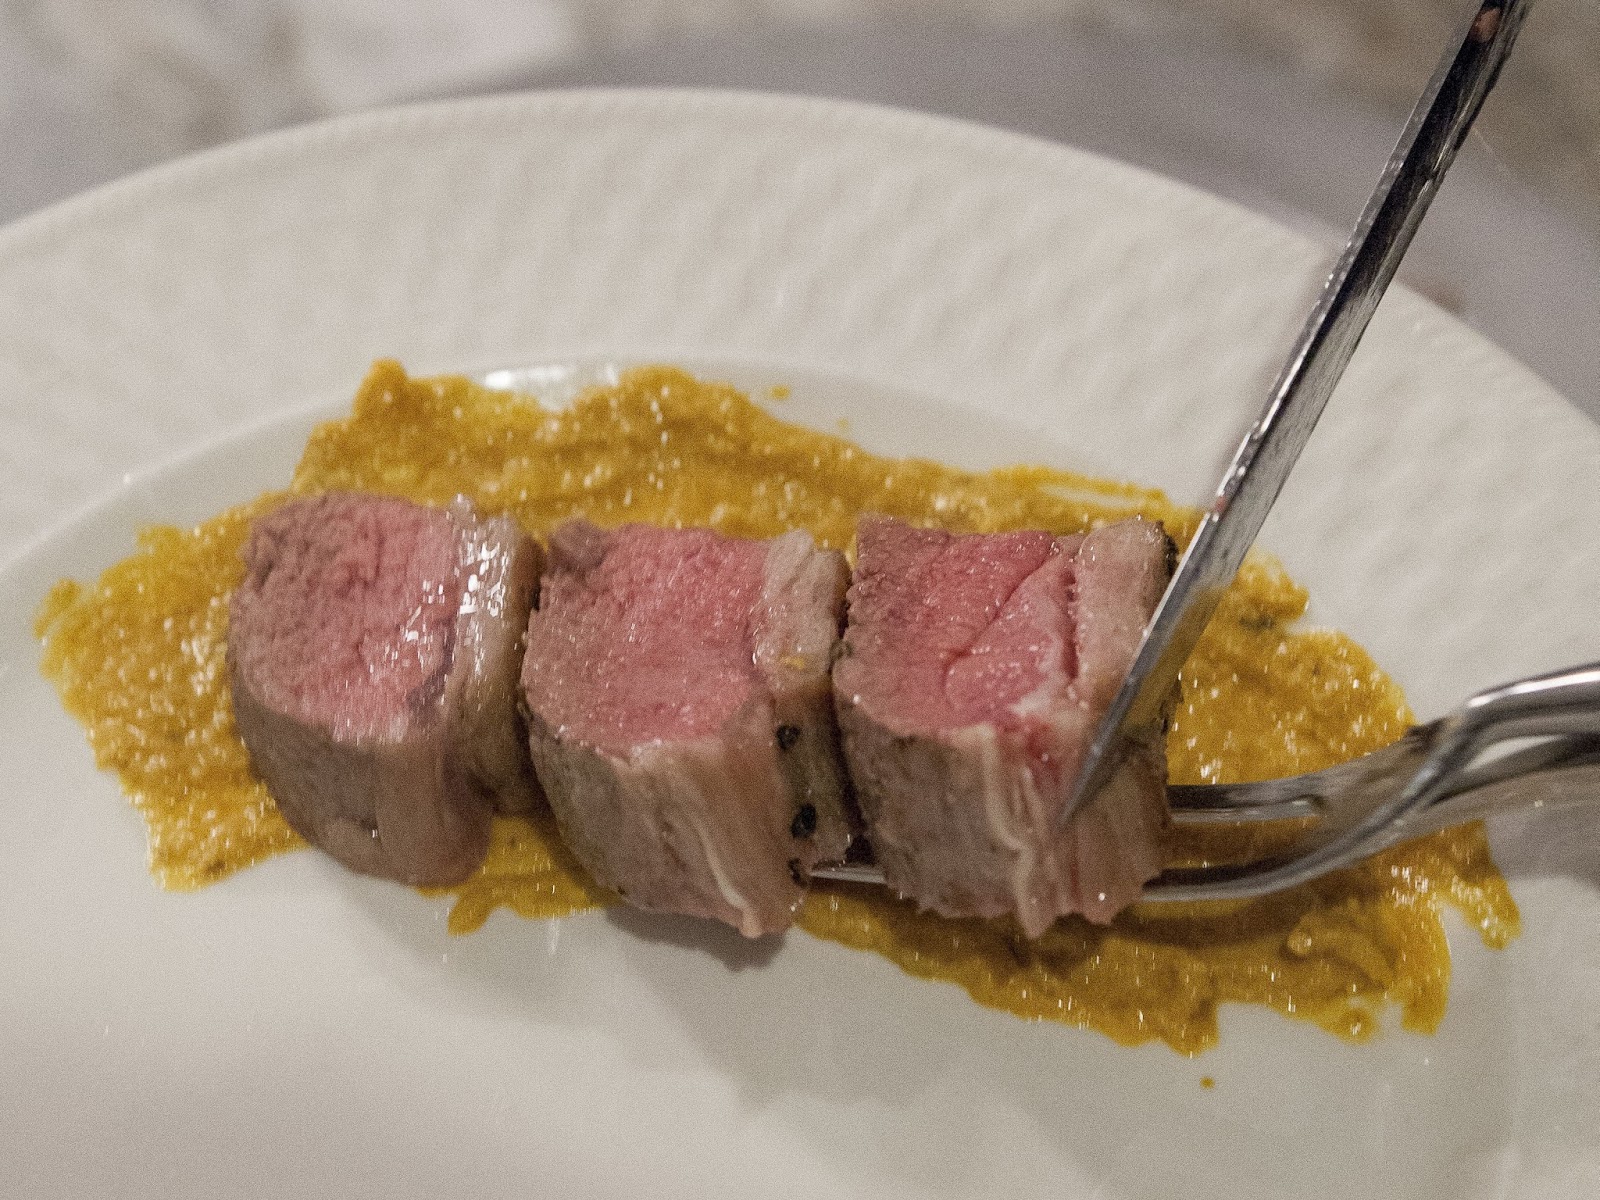
Slice the meat into medallions.


Brush a layer of the sikandari sauce across one side of the plate, and lay the medallions on it.


Adjust them.

Drizzle a bit of the sauce across the top of the meat and serve it up.


I served this dish with Basmati rice with whole spices, Indian spinach and corn.

   I served a salad of spiced chickpeas with mango and grapes as a starter. It was amazing. The  spices in the sauce accented the lamb, but did not overpower it, and vice versa. The meat was succulent, juicy, and tender. I am now totally hooked on this amazing grass fed lamb which is so easily prepared. In fact it takes such a little bit of cooking to be perfect, it's hard to mess up. I'm two steps away from wanting to move to New Zealand.

   This is the lamb, that a Hobbit would enjoy and you know how much they love to eat!!!

I'd love to share more lamb recipes with you if you'll just click on the link and give me your vote for my recipe in the   Marx Food Silere Lamb Contest   I'd really appreciate it!
   I'd like to thank the Becca Lee and all great folks at Marx Foods and Silere Alpine Origin Lamb for allowing me this amazing tasting experience, thanks for spoiling me. Coming up next, great sides to serve with great lamb follow along on Twitter @kathygori

Thursday, February 28, 2013

Chocolate and Mint. Mousse for the Masses


   This last weekend was Oscar weekend or as it's known around our house, The Hollywood Super Bowl. For years, even when I was a little kid, the whole family would park itself in front of the Teevee to watch the dresses, the glamour and all the envelope ripping. Oscar Day was like a national Holiday for Fran. Where my dad would yell at us during any sort of football game if we stepped on the loose board in the living room that sent the television picture spinning, everyone knew to stay out of mom's way on Oscar night. It always started early with the Red Carpet arrivals and didn't end until Barbara Walters had made someone cry.

   When I had my own home, I followed those rules handed down by my foremothers. One does not move from the TV during the Time of Oscar. For many years I had food prepared and waiting for my guests to help themselves so that I could watch everything, beginning to end. And then there was this year. The Year of the Momo.

   It had started the week before when our house guests from LA were up at working at Pixar and decided to come spend the weekend with us in Sonoma. I had a request to make some momo, and that request turned me into a momo making fool. The momo were so easy and quick to make that I thought to myself, self, why not just make momo for your yearly Oscar event? It would be easy. And fast. And who doesn't like momo? You can serve them with various Indian side dishes and homemade chutneys. Easy peasy. And then I started inviting people. More than a dozen to be exact. I remember lying in bed and thinking to myself, how many momo can one person eat? They're small, they're tasty, they're eaten in one bite. Holy shit!! I'm going to be making like over a 100 momo!!! What the hell have I done?!

   Then I started checking out our guests for food allergies, something I always do. I had 2 gluten frees, 1 vegetarian who was also a piscatarian, 1 nut allergy who could only eat coconut and 1 lactose intolerant. **** Bad word of choice goes here. So now I was faced with a math problem. How many gluten free, how many nut free how many....Arrrrrgh! I would need a slide rule to figure it out.

   Needless to say I spent the first 30 minutes of the Oscars in the kitchen with the sound turned up surrounded by tall stacks of various bamboo steamers. Multi steamers marked for no allergic cross contamination. My kitchen looked like a hole in the wall dim sum parlor run by a bamboo steamer hoarder.

   At least the dessert was easy. A few days before, my friend and fellow Sonoman Anne McKibben who founded CocoaPlanet asked me if I'd like some chocolate to use in whatever I was concocting for dessert.  When someone offers me chocolate they usually don't have to ask twice, especially this CocoaPlanet stuff.


   What can I say about a company who's motto is "More Taste Less Sugar." Each piece is less than 100 calories, and contains only 8 grams of sugar. Plus it's Gluten Free and Kosher. I actually buy the stuff myself, to use at home, but of course if Anne wants to give me some, that's okay by me. It comes in several flavors. After she heard I had a bag of Mint Crystals that Marx Foods had given me, she contributed Cocoa Mint chocolates to the pot and a chocolate mint mousse was born.

Chocolate Mint Mousse


Here's What You Need:

7 oz of semi sweet chocolate. I used 7 squares of CocoaPlanet Cocoa Mint
4 egg yolks
1 tsp vanilla
3 Tbs sugar
2 cups of whipping cream
Extra whipping cream for topping
Mint Crystals

Here's What You Do:

Chop the chocolate into pieces and set it aside.


Whip the egg yolks, sugar, and a pinch of salt together in a metal bowl and set it aside.


Heat 3/4 of a cup of cream in a pot.
When the cream is hot, slowly drizzle it into the metal bowl full of egg yolk mixture.


Keep stirring while you do this, otherwise you will have scrambled eggs and not a custard base for the mousse.

Note: Some mousses, (meese, mice, moussi??) are made with a gelatin base instead of eggs. Here is one recipe. I didn't use gelatin in this mousse as one of the vegetarian guests does not eat gelatin and I didn't want to take a chance experimenting with agar agar on this particular recipe. I had my hands full with momo and rice paper wraps.

Once the cream and egg mixture is well whisked in the metal bowl, pour it back into the pot.

Now it's time to cook the custard.
Keep the heat on medium low and stir it constantly. It's ready when your thermometer reads 160 degrees.
Usually I just eyeball custard and consider it done when it coats the spoon thickly, but if you want to be technical, it's 160 degrees you're looking for.
When the mixture has reached 160, pour it through a fine strainer into a bowl.


Add in the vanilla.
Melt your chocolate pieces, either in a glass bowl in the microwave at half power for about 3 to 5 minutes. (Take it out every minute or so to stir it) or as I did, in a metal bowl over a pot of boiling water.
When the chocolate has melted (it doesn't take long) blend it into the custard.


You want to whisk this stuff until it's smooth and glossy then set it aside to cool.
When it's cooled (also happens fast) start whipping the cream.
Whip 1 and 1/4 cups of cream into barely stiff peaks.

Okay, now here's a confession. I was whipping and then decided to check on my hand blender. So, I turned it off and lifted it out of the bowl to examine it. I then decided to start whipping again, holding it near my face I turned it on. Alan said he saw that was what I was going to do but couldn't believe I would actually do it. I wound up covered in whipped cream.


That's after cleaning up. So, nobody's perfect.

Take the whipped cream and whisk about 1/4 of it into the mousse well. This will lighten the color and make it easier to work with.


 Gently fold the rest of the whipped cream into the mixture...


...until it's all folded in.


Spoon the mousse into individual serving glasses, cover them in plastic wrap and chill for at least 7 hours. I made mine the day before the Oscars, which was one less thing I had to do. Much appreciated as this is a great make ahead dessert.

The one thing I didn't do was the individual glasses. This recipe serves 8.  I  doubled it and then put it all into one large bowl, which I then spooned into individual servings as I don't have 16 all of one kind of glass.

Before serving whip some unsweetened cream.
Place a dollop on top of each mousse and then sprinkle the whipped cream with crushed mint crystals.


The result is a light and fluffy cocoa mint mousse.

Postscript: While cleaning the big bowl this was served from, I was preparing to rinse it in the sink. Alan yelled "No!" and wrestled it away from me to scrape what thin shreds of mousse remained. Classy? No. Delicious? Yes.
 
   What have I learned from this Oscar experience? I will never again serve momo to an army of people when there's something I want to see on TV. But this Cocoa MInt Mousse is a big time keeper and I'm very eager to try it with some other of CocoaPlanet's chocolate flavors. I'm truly hooked on the stuff. Thanks to Marx Foods for the Mint Crystals and CocoaPlanet for the delicious chocolate!!

  Coming up next Spring is nearly here, and it's fresh, green and healthy time again. Follow along on Twitter @kathygori

Sunday, February 10, 2013

Marx Foods Says: "It's Easy Being Green." Cardamom Bamboo Rice Mousse


   There are a lot of green foods. Greens for one. Spinach, kale, chard. Then there are all the fruits and vegetables, from peas to pears, apples to mangoes, and of course Kermit the Frog.


   Green however is not something I'd normally associate with rice. I've had red rice from Bhutan, and black Forbidden rice, and brown rice and wild rice which technically isn't even really rice, but never, ever, green rice. I am always looking for new forms of rice to taste test and sample, so it was no surprise when offered a chance to experiment with some of Marx Foods Bamboo Rice, I'd jump at the chance. It's all part of their Easy Being Green blog challenge.


   We, the food writers, get a package of green foods and it's up to us to get creative with them. Marx Foods sent all of us Bamboo Rice, dill pollen, green eston lentils, mint crystals and green cardamom. Lots of good things can be whipped up with that combo. The rules were that we must use at least 2 of the products in whatever dish we made.

Of all the ingredients, the one that really called out to me was the bamboo rice. Bamboo rice in case you've not heard of it (I  hadn't) is a short grain sticky type rice which has been infused with the juice of bamboo. It has a lovely grassy green, almost minty aroma and a mild taste. Of all the things in the package I was sent, that was the one I most wanted to try.


   Second up was the mint crystals which I'd also never heard of before, but hey, that's why I go to Marx Foods. They've always got the latest, most interesting stuff. Mint crystals are fresh mint and pure cane sugar turned into crunchy nuggets. Since the blog challenge was to use any two products in the package and create a recipe, I knew which ones I was going to be using. I was determined to make something featuring the bamboo rice, mint crystals and green cardamom pods. After thinking long and hard, yesterday I had my answer. I'd make a rice mousse infused with green cardamom and flavored with mint crystals and cocoa nibs.

Cardamom Bamboo Rice Mousse with Mint Crystals and Cocoa Nibs


Here's What You Need:

1 and 1/2 cup of cooked Marx Foods Bamboo Rice
1 Tbs green cardamom pods
2 cups of milk
2 Tbs of plain powdered gelatin
1/4 tsp of vanilla extract
1 cup of whipping cream
2 Tbs of cocoa nibs
2 Tbs of mint crystals
1/2 cup of sugar

Here's What to Do: 

Add 1 cup of bamboo rice to 2 and 1/2 cups of water.
Bring the water and rice to a boil.
Put a lid on the pot and turn down the heat to simmer for 20 minutes.
When the rice is cooked, fluff io with a fork and set it aside to cool off.

To Make the Mousse:

Put the whole cardamom pods into a mortar and pestle, and crack them.


Take the seeds from the pods and grind the seeds down to a grainy powder.
Combine the milk, sugar, cooked rice, and cardamom in a pot and bring everything to a boil.
Meanwhile, dissolve the 2 Tbs of unflavored gelatine in 1/2 a cup of cold water to soften it.
When the milk sugar, rice and cardamom are boiling, add in the gelatin mixture.
Whisk it in well so as to not have any lumps.
Set it aside on a counter to cool
Meanwhile whip 1 cup of whipping cream with the vanilla extract.


When the mixture starts to firm up a bit, gently fold in the whipped cream vanilla mixture.


Set it in the fridge for a couple of hours to cool and set.
Roughly chop the cocoa nibs and mint crystals.
Scoop the mousse into individual serving dishes and sprinkle the tops with a mixture of mint crystals and cocoa nibs.
Serve it up.


   Creamy delicious. It may look like it but it's not a rice pudding, it's fluffy like a mousse. Alan has not stopped talking about how much he loved it, so there's that. I loved working with the bamboo rice and mint crystals. Trying those new products has given me a lot of ideas for future use in savory dishes. Thanks Marx Foods. I always love the surprises you folks have up your ample food stuffed sleeves.

   The voting on this Easy Being Green Blog Challenge is on so hopefully you'll give this recipe a shout out by voting for it HERE. Coming up next fun food for Oscar parties. Follow along on Twitter @kathygori.

Tuesday, December 7, 2010

The Iron Foodie Voting is Open Today!!!

       As you know I am one of 25 Iron Foodies Competing in Marxs's Foods 2010 Iron Foodie Contest on Foodie Blogroll. The voting opens today and voting will remain open until midnight December 15th. I hope you'll check out my Indian Style Cheesecake, then click on This Link to vote for me.

Tuesday, November 30, 2010

My Marx Foods's Iron Foodie 2010 Entry, My Twist On Chenna Poda, Indian Cheesecake.

                                       
            Iron Foodie 2010 | Here's Why that will be me:         
MarxFoods.com -- Fine Bulk Foods         The Foodie BlogRoll
   When I was told that I was to be one of 25 Iron Foodies, I was excited. I ran around telling my friends and family. I was gonna be an Iron Foodie. I was gonna get a mystery box from Marx Foods and I was going to create a signature dish from whatever they sent me. Wow! All those months of watching Chopped wouldn't be going to waste. I'd told Alan I was working when I was watching, now I wouldn't be a liar. It was all for a good cause. I'd finally get my chance. Then I got scared. What the hell was I going to do?? What had I gotten into? What was going to be in the box? The rules stated that I had to use 3 of the 8 ingredients included. I couldn't wait to see what I'd been sent.
    The box arrived right on schedule.
  I ripped it open.
   There it all was, Tellicherry Peppercorns, Maple Sugar, Dulse Seaweed, Fennel Pollen, Smoked Sea Salt, Aji Panca Peruvian Chiles, Bourbon Vanilla Beans, Dried Porcini Mushrooms. There was my dilemma, what to do? What to make? Hot or cold, sweet or savory, mild or spicy?  A lot of possibilities flashed through my head but I couldn't settle on any one thing. I knew I had to get moving on whatever it was. I was going to cook and I gave myself until Thanksgiving to make up my mind. I read. I did research. I decided that I'd go with the sweet.
   I wanted to make it an Indian sweet but one that I'd never fixed before. Then I had it. Cheesecake. And not just any cheesecake, but the only cheesecake made in India, Chenna Poda from the state of Odisha. It turns out that cheesecake originated there about 50 years ago when a baker left some cottage cheese in a partially warmed oven. The next morning bingo! Cheesecake! I also decided on cheesecake because this is the time of year when all of us are involved in a lot of dessert fixing. Cheesecake always looks great on any Holiday table.  As a matter of fact I think cheesecake looks great almost anywhere! I also wanted to create a recipe that would be a bridge between the type of cooking I do most of the time (Indian) and a very familiar dessert for most people.
   I decided to make some chenna cheese for the filling. Of course I had to put my own spin on this cheesecake, so I thought I'd make it with a chocolate, chili, graham cracker crust with the aji panca chilis I'd been sent. I'd use the bourbon vanilla beans from the box to flavor it and the maple sugar as a sort of brulee topping. I would caramelize. I would buy a torch! I was excited! I was going to make

Indian Cheesecake With A Chocolate Chili Graham Cracker Crust and a Brulee Top


   The first step involved making the Chenna Cheese. If you don't want to try making your own chenna cheese (it's pretty easy just click on the link above for directions) Ricotta cheese makes a great substitute.
  Of course I use only the most sophisticated method in my cheesemaking. Note the high tech equipment.
   Once the paneer cheese was made, it was one quick step to turn it into sweet chenna cheese. All that was needed was to add :
2 tsp of sugar
1 tsp of flour
Then knead until the chenna is soft and pliable.
Place it in a bowl along with 2 packages of cream cheese.
Now for The Crust.
Seed and toast 1 large Marx Foods Aji Panca Chili Pepper. Put the pieces into a spice grinder until you have a fine powder.
    In a food processor mix
1 pack of graham crackers
1 Tbs of Valhrona cocoa powder
1/4 cup of melted butter
1/2 cup of sugar
the ground chili powder
 
Press the ground-up crumb mixture into the bottom of a greased 8 inch springform pan.
Put the pan with the crust into the freezer for 30 minutes to set. Preheat the oven to 350 degrees.
Now for The Filling.
All filling ingredients should be at room temperature.
In a large bowl beat together 2 packs of room temperature cream cheese along with 1 cup of chenna cheese and 1 cup of sugar.
Beat for about 2 minutes until it's nice and smooth.
 Blend in:
1 egg yolk
2 Tbs of flour
When that's blended, add 4 more whole eggs.
Scrape in the seeds from one Marx Foods Bourbon Vanilla beans.
Blend for another 3 minutes or so. Don't over beat.
Take the pan from the freezer, set it on a cookie sheet. Pour the batter into the pan.
Put the cheese cake in the middle of the oven. Note: To prevent cracking, place a bowl of water on the rack below the cheesecake.
 Bake at 350 degrees for 15 minutes, then lower the heat to 250 degrees and bake for another 1 and 1/2 hours.  The cheesecake is done when it feels firm to the touch and yet the center is still a little jiggly.
Place on a cooling rack for one hour.
Okay, now here's something I learned the hard way. This cheesecake has to rest in the fridge for at least 6 hours before you can eat it. Overnight is better.
 Waiting was hard, but boy was it worth it.
 The next day unmold the cheesecake.
Now for the final touch. Before serving, sprinkle the top with Marx Foods Maple Sugar.  Ignite a culinary torch and slowly moving it over the surface of the cheesecake but not touching it... melt the maple sugar.
Or if you haven't got a culinary torch, you can always go old skool with a salamander.
Heat it on the stove till it's red hot, then hold it over the sugar till it melts.
 As soon as the sugar has set for about 5 minutes or so, have at it!
    The cake was amazing. The combo of glazed maple sugar, chilies, and vanilla bean was delicious.
In India this cheese cake doesn't have a crust. In fact it's baked more like a flan with the sugar on the bottom of the pan, batter on top and then upended for serving. Making the cake the way I did crosses it with the version of the cheesecake we're all more familiar with... plus you get to play with a blow torch!
   I want to thank the great folks at Marx Foods and Foodie Blogroll for giving me a chance to compete in the Iron Foodie 2010 competition. I hope when voting opens on the 7th you'll give me a vote. I loved my box of goodies and can't wait to do more experimenting with the ingredients I haven't used yet.

LinkWithin

Blog Widget by LinkWithin